
The main principle behind sequence project and export settings is to limit the number of times you will need to change video formats (and things like resolution and pixel aspect ratio) during the whole video production process. Therefore, you should be aiming to get your project settings to closely match the format of your original video clips.
Even if you plan on reducing the resolution of the video when exporting it, you would still want the sequence settings to match the format of the original video clips. You would then reduce the resolution when you export the video after editing.
1. Automatic Method: CC and CS6
This method is very convenient, and is especially suitable if all your video clips are in the same format. If you are using Premiere Pro CC (or even CS6), you can have the program automatically select a project setting to match your original video.
When Premiere Pro opens, select ‘New Project’, choose ‘HD Video’, give the file a name, select the location and click ‘OK’.
In Premiere Pro CC, the program will open, and the next step is to import your videos into the project (e.g., select ‘File’ – ‘Import’). Once you have imported the files, they should appear in the Project panel. Choose one of the clips and then drag (hold the left mouse button down) that clip from the Project panel into the Timeline panel (as shown below).

The sequence is created and you will then see three things: (A) The newly created sequence appears in the Project panel, (B) the sequence name appears in the Timeline panel and (C) the video clip appears in the timeline panel.

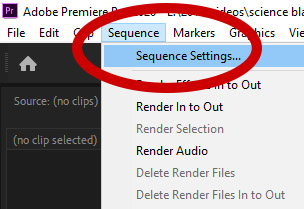
The settings are done automatically. You can check them by selecting ‘Sequence’ – ‘Settings’.
This is what that setting panel shows after I added dragged one of my videos from the project panel into the timeline panel.

You can change the name of the sequence by double clicking on the existing name in the project panel and typing in the new name.

Important
If your original video clips come in different formats, when you are choosing which clip to drag into the Timeline, you should choose a clip that is in the format that will make up the majority of your video (unless you have a lot of low resolution clips and a few higher resolution ones, but want the final video to be in higher resolution. If this is the case, you would choose one of the the higher resolution clips.)
2. Manual Method
I highly recommend the automatic method, but if you are using the manual method, the main principle is that your sequence settings should closely match the format of your original video clips in terms of three main aspects:
- Resolution (frame width and height as measured in pixels—this is also called frame dimensions) and pixel aspect ratio
- TV system (PAL or NTSC) and frame rate (these two things go together)
- Scanning method (interlaced or progressive)
I think the information here is already quite complicated, so I won’t bother trying to explain things like scanning method and pixel aspect ratio in detail.
Hopefully, you know the necessary information (resolution, pixel aspect ratio, TV system and scanning method) about your video files already. You can find these details in your camera’s specifications. If necessary, you can download a free multi-media analyzer like Media Info (mediaarea.net/en/MediaInfo) AVIcodec (http://avicodec.duby.info/).
In Premiere Pro CC, after selecting the project name and destination, select OK and the program will open. You would then select ‘File’ and then ‘New Sequence’. In CS4 to C66, there is a two-step process before the program opens: project settings followed by sequence settings).


2.1 Resolution (frame width and height) and pixel aspect ratio
There are five main HD resolutions:
- 3096 x 2160 (4K)*
- 2560 x 1440 (2K)*
- 1920 x 1080 (1080p): This is the most common one at the moment.
- 1440 x 1080: This is called anamorphic video. The pixels are rectangular with a pixel aspect ratio (width : height) of 1.33 : 1. When exporting the video, you may downscale it to 1280 x 820 with a pixel aspect ration of 1:1 (square pixels)
- 1280 x 720
*Premiere Pro CC can handle all of them but for the two highest resolutions 2K and 4K, you will need a powerful computer. If your computer or software are struggling and the programme cannot handle such high resolution video, you can convert the files to a standard 1080p format before editing (this is not ideal, though).
2.1.1 Default Selection
When selecting settings, there is a wide range of presets suitable for HD. You can go through the main categories like AVCHD (for mts video from camcorders) and HDV. There are also presents for DSLR cameras (In CS6, these sequence settings presets sometimes do not show up when the programme opens. If you cannot find them, simply close the programme and reopen it and they should appear).
If there is no suitable default selection, select a preset that is similar to the format you are using then click on the Settings tab and change the settings to match your format.
2.1.2 Exporting Lower Resolution Video
You might want to reduce the resolution (i.e., the frame dimensions) when exporting. For example, if you are recording in 4K, you might still want to export the video at 1920 x 1080. While editing you would be able to pan and zoom. This is especially useful if there are a lot of problems with the way the shots are framed (weird angles, too much headroom, the subject is too small, etc.)
To do this, the best option is to create a sequence that, as mentioned above, matches the original footage and scale it during the export stage.
If you are using 4K video at 3096 x 2160 as the original and exporting to 1920 x 1080 for the final video, you can zoom in while editing by adjusting the scale anywhere from 100% to 161.25%. Just remember that if you use this method, you should avoid adjusting the scale by more than 161.25% or your exported video will start to look pixelated. If you are going from 2560 x 1440 to 1920 x 1080 the maximum you should zoom in (i.e., increase the size) is 133.33%
2.2 Interlaced (i) or progressive (p) scanning
You should choose the scanning method (interlaced or progressive) of your video clips as the project setting. Nowadays most consumer camcorders use progressive scanning, but a lot of older camcorders will record with interlaced scanning.
If you are working with interlaced video, choose the presets marked with an ‘i’. If you are using HD video, you shouldn’t have to worry about choosing the Field Order. For HD video, PAL and NTSC both use an upper-field first order.
If the original videos you will be editing are already ‘progressive’ (i.e., non-interlaced), then choose a ‘p’ setting in your project settings.
2.3 TV system and frame rate
a) If you are working with PAL video clips, you should choose from settings marked PAL or settings where the frame rate is 25 fps (25p) or 50 fps (50p) ; for interlaced formats, you will select 25 fps (50i).
b) If you are working with NTSC you should choose from settings marked NTSC or settings where the frame rate is 30 fps (29.97 actually). For progressive formats, this is shown as 30 fps (30p) or 60 fps (60p); for interlaced formats, it is shown as 30 fps (60i).
c) If your camera records video at 24 frames per second, that is the rate you are looking for.
2.4 Examples
I used to work with video shot with an old Canon HG10 camcorder (PAL system, 25 fps, intelaced, 1440 x 1080 anamorphic AVCHD video), so I would choose the preset ‘AVCHD → 1080i → AVCHD1080i25 (50i) anamorphic‘ in Premiere Pro CC.
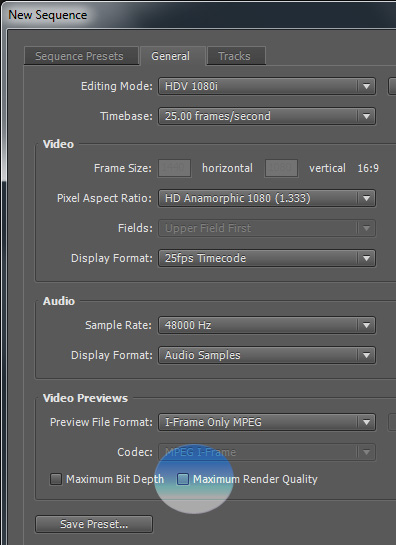
Here are the settings for a newer camera. The pixel aspect ration is ‘Square Pixels’ and the frame rate is 50 frames per second and the scanning method (under ‘Fields’) is ‘No Fields: Progressive Scan’.
My Other Articles on Video Editing
- Exporting HD Video for YouTube: Premiere Pro
- Exporting Standard Defintion Video for YouTube: Premiere Pro
- Exporting Video for Nico Nico Douga: Recommended settings
~by longzijun

Return to Writing

Thank you so much. Adobe can’t even put up some simple tutorials but you explained 1920 and all of its goodies in one freaking post! Totally saved my music video project.
Thanks. I hope you can post a link to the music video when you are done. I’ll try to get my students to do a music video or two this year, so it would be good to see what other people are doing.
Woww its is very good for you have done I’ve been using cs4 by myself and I don’t know how to work it out probperly (no-background) but its good to have your blog here Cheers!!!
Hi,
Is there any way to see if the video is 1080/50p or 1080/50i??
I have some shots made with a Panasonic HDC-HS700K, I need to edit them but I don’t know witch setting to choose because I don’t know the way it was shot!
Is there any way to find out?? Can you help me?
Thank for you time…
Nice blog by the way ;)
Hi Bruno,
According to the reviews of your camera model, you are probably working with progressive video (the ‘p’) setting, so it would be 1080/50p if your camera records PAL video (e.g., Britain and Australia) or 1080/60p if working with NTSC video (e.g., America, Panasonic and Canada). However, your camera also has an interlaced mode (the ‘i’ setting), so you would have to check what mode you chose when you shot the video. The systems for each country are shown here: https://en.wikipedia.org/wiki/File:PAL-NTSC-SECAM.svg (apologies if you know the system already).
You can also double-check whether you are using interlaced or progressive footage by using video conversion software or media-analyzer software. I use the former (Procoder, but the software is expensive). Free media analyzer software like this one – http://avicodec.duby.info/ – should also tell you.
Some bad news though–the 1080/60p and 1080/50p full HD settings are very unusual (your camcorder is apparently first to have them), so you may run into problems with export and playback . A poster on that forum (https://community.adobe.com/t5/premiere-pro/panasonic-tm700-1080-60p-28mbps-files/td-p/2635481) recommends the following settings for CS4:
“In the “New Sequence” Box click on “General”
Under “Editing Mode” choose Desktop
Under “Timebase” choose 59.94 (NTSC) or 50 (PAL)
Under “Frame Size” put 1920×1080 Under “Fields” choose “No Fields” (since it’s a progressive file)
After those steps, you hit OK”
Hi again,
First I would like to thank you for the quick and clarifying answer!
About the system mode, I already know it, thank you anyway, I from Europe, Portugal and the system we use is PAL! I have a little knowledge beacuse some years ago I made a Video Post-Production workshop…
I already check my video and it was recorded in interlaced mode, I say that because even when I use the preset “AVCHD-1080p-AVCHD 1080p25”, I import the video and when I check “Interpret footage” is appears “Upper Field First”! So I guess it was recorded at 1080i… And by the way, I can see the fields when people in the clip are in movent, something that doesn’t happens in 1080p, I guess…
I didn’t used the software you recomended because I’m a Mac user and it seems to me it is just for PC/Windows…
About the export and playback problems I guess I won’t have them since my clips are 1080i and not 1080p.
Thank you, this was very helpful!
Just another question, is it normal that the clips have a little bit of grain/noise in the entire clip, not just in the low light areas?? The camera was not mine, so it was the only shot I’ve made and I think it have too much grain/noise for an Full HD shot… I expected a more clear shot!! If it’s normal, what’s the best way to remove it, make it a clear shot???
Thank you for your time once again!
Cheers…
Which preset selected for sony hdv 1500model footage..? this footage saved in (720*576(1.4587) 25fps 48000hz-16bit-stereo)
for that file, look for a present that says PAL DV Widescreen (you are not working in high definition)
Thanks my friend! You saved me! :) AWESOME!
If you are shooting in HD, it is always widescreen (1920×1080, 1440×1080, 1280×720 are all widescreen formats). If you are shooting in standard definition, you can check your camera settings). You can also open two Premiere Pro projects, one widescreen and one non-widescreen, import a video clip and simply see which setting matches the video clip..
________________________________
Reblogged this on Sensei Nobita and commented:
perlu diperhatikan, setting sequence HD untuk premiere cs3/4/5
Hie, am new to this and I have a video of mpg format, don’t kno the camera it was shot with but it has the following details, frame width 720, frame height 576, data rate 9100kbps, frame rate 25frames per sec, audio 256kbs,channels 2, sample rate 48khz
It’s failin to import to adobe Premeir pro, am using cs6, tried converting it to avi Buht the loss in qaulity seem huge, and that is happening when I try to make the video full screen
Any advice?
Advice? Probably nothing you haven’t already tried.
a) Maybe it is a strange kind of mpeg 2. When converting it to AVI, try to adjust the settings to get higher quality (the bitrate seems really high for non-HD video).
b) It may be a CS6 problem. Make sure the latest updates are installed. It seem others are having the problem and some workarounds are suggested here (e.g., in Windows 7, right click on the exe file and select ‘run as administrator’:
http://forums.adobe.com/message/4445823
thank you i am write now in africa for folunteering and got to go back to cs3 and interlaced 1080i, Technology evolve so fast that I am not use to all those complication anymore. With 1080p and CS6 I didn’t have those problems back home.
I repeat, you are awesome!! thanks
Hi
let me know which problem happen when export the video in quick prayer fomart when i want to burn in DVD the problem come the color there too much up the people doesn’t watch. well so can you help wich step i miss to do in export or even all project?
That is not very clear . . . can you rephrase your question?
If you are making DVDs to play in a DVD player, you should export is as an mpeg 2 DVD format and all the settings would be different, (this page is only for exporting videos to be posted to YouTube of Vimeo)
With the mpeg 2 DVD format, you end up with two files–a video file and audio file. Then you would need another software programme (like Adobe Encore or Sony DVD architect) to make the DVD.
Hello, thank you for the post, is very helpfull, i just have on question, i have my footage in 1920×1080, but i would like to work on 1280×720, just in case, and because is going to played on computers and monitors. But when i select on premier 5.5. the P2 720p 60HZ DVCPROHD option, the video says 960×720, should i change it to 1280×720? and leave all the rest as it is? Thank you men, you will help me a lot. Keep with the post.
Hi Chris, don’t select the DVCPROHD preset. Select the HDV one or AVCHD one. Those will give you the correct dimensions (1280×720)
is there any way i could use standard and HD footage and make them both fit the same exact size on my sequence preset?
The only way is to make the project setting standard (e.g., non HD) and then alter the scale of the HD clips in the timeline. When you export it, you would also use a standard setting.
If most of your clips are HD, however, I would go for 1280×720 and either leave a black border around the standard clips or scale them up and hope the pixellation won’t be too ugly. Then you can export it at the 1280×702 setting.
Hey I Love your Blog ..thank you for helping Us , i need to know about the best export dimension From Flash to premiere for HD animation Movie / and i need to know the image size or dimension in Photoshop for HD videos
I really don’t know much about Flash. I would suggest the standard full HD resolution (1920×1080), but I never use Flash.
If you are importing photos/image files into premiere pro, just make sure that the width or height (whichever is longest) is less than 4000 pixels or you will have trouble exporting. You might be able to import images larger than that 4000 pixels, but then you will not be able to export the video. And of course, you better not use images smaller than your video resolution (e.g., not smaller than 1920×1080, or 1280×720 if your video is not full HD,)
Hello!
I have Toshiba camcorder and Canon still camera. They both use H.264 codec and maximum resolution 1920×1080. Canon makes 23,98 fps and Toshiba max 59.94 fps (intelaced).
Toshiba can not really use such high values. Result is best with 1208×720 29.97 fps.
I have Premiere CS6 (mac). Which project settings I should use. There is no preset for H.264 recordings.
If you are mixing up different formats, you can try choosing the settings that most closely match your export format, which I guess would be 1280 x 720p (e.g the import preset of AVCHD 720 24p or 30p). I would do a test run combining two short clips from both cameras and try out different frame rates for the setting and export (24, 30–here 30 means 29.97).
You might also try converting both files using freeware like Format Factory into AVI files. before the editing process. No matter what you do, there is going to be some loss of quality along the way.
With Premiere Pro, different formats can lead to export failure. That happened to me last week. In my project, I had two WAV audio files with different bit rates (44.1 kbps and 48 kbps), and the video wouldn’t export until I converted everything to 48 kbps.
thank’s you so much.. :)
Thank You for good advise. I still could not get good quality. I think the cause is bad quality of original Toshiba 1920×1080 interlaced clip. It is too much compressed so it is very pixellating.
Nice blog,thumbs up.am proudly nigeria
I have an mpeg2 video but i can not import it to premiere pro cs6,please i need a way out ,thanx
I thought CS6 could handle that? If not then why not convert the original video into AVI using freeware like Format Factory?
It works, Tanx
Hi .This is a great blog,and I found a lot of information here. Also I have a question that I asked around and nobody can give me clear answer .
I want to buy a pro-video camera from United States -NTSC- ,but i want to use it in Romania exclusively-PAL- . I will use CS6 Pro . My question is : Will it make a difference the processing from Ntsc to Pal in HD quality ,or it will be just a hassle to deal from NTSC to PAL ?
Thank you for you time and help !
a) it will make a difference, but I am not sure how big a difference, you better keep asking around
b) another problem is that during the recording, lights may flicker. There are workarounds to that problem (like changing the shutter speed on the camcorder, but you would have to check you have that option) http://urbanvideo.ca/avoid-video-flicker
Hi,
look gyz I really need help,
in cs3 how can I change my video moode like
screen to overlay, overlay to darken etc
in cs3
Hi
I am new to Pr and need to set up a document which is suitable for 200 dpi, and be viewed on a 42 inch HD TV.
If I go into new sequence – how do I make sure it’s correct for these specifications?
Regards,
Nic
For video on standard TVs and computer monitors HD is shown at 72 dpi with a resolution of 1920 x 1080. You cant really increase dpi on a video monitor, so don’t worry about it. You main concern is the resolution.
The higher dpi is for printing. For printing, 200 is a minimum for reasonable quality, but 300 would be preferred (for reasonable quality). You would set that in image editing software.
I have created the sequence in DV 48 hz but I want the video in HD 1080p… What to do? plz help..
48 hz is a sample rate or refresh rate
1920 x 1090 is a resolution. What do you mean exactly?
Hello
Haha thanks for the lecture
Need more tutorials on how to export the footage
Great
I like the teaching
Hello
I like that
Keep on updating us
I have learnt alot